Sunday, April 22, 2012

Simple Chair Update

 I LOVE chairs. My husband and I can't get enough of them so it is surprising that for the longest time we had to pull out our food storage buckets as seats whenever more than one couple came over for dinner. One of our latest chair finds was inspired by a Chinese table we inherited from my husbands parents. It was lonely so we found it a friend...


The splat (middle back) of the chair somewhat reminds me of the Chippendale chairs that were inspired by Chinese design so we thought it would fit right in.


Chair from thrift store- $5.00
Polyfill- $2.00
Black spray paint- $2.00
Small can of black paint (already owned)
Fabric- $3.00
Staple Gun (already owned)

 Ryan (hubby) and I found this awesome fabric at a local JoAnn's. We thought it was perfect.

The chair had some sort of finish to which our spray paint wouldn't adhere so after a couple layers of spraying, we touched it up with a can of black paint we had laying around.

Some Polyfill and staples later this was our final product.


Tuesday, April 17, 2012

Laundry Cart

Hello all. I am Kim, the oldest (and shortest) of this beautiful bunch. I'm happily married, usually happily raising 3 girls & a boy and unhappily cleaning my own house and taking care of my own yard.
Almost a year ago my family returned to the USA from a 6 year expat assignment in Chile. It was awesome & hard at the same time. Little did I know that it would be so hard to return to 'normal' life. 6 years of having a fulltime maid and a weekly gardener pretty much ruined me... most days I find myself waiting for my magic cleaning fairy to appear. She never does. Many of my posts will be focused on relearning cleaning & organization skills, as well as emergency preparedness (yes... we have experienced more than our fair share of earthquakes).

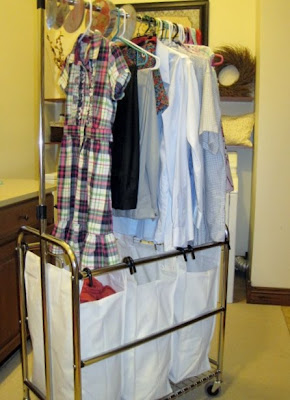
My laundry room is decent in size, but majorly lacking in functionality. And I hate folding clothes. I used to fold everything right out of the dryer and put the clothing into individual baskets for each of the kids (sound familiar mom?). The problem was that by the time the clothes were unloaded into drawers, they usually weren't folded anymore. Plus, who can find a shirt if it's at the bottom of a messy drawer? Not my kids.
Investing in a laundry cart with a hanging bar above it has solved both my poorly-planned laundry room problems, as well as the lost, wrinkled clothing issues. First of all, it has wheels. There is not a really great space for it in the laundry room, so it lives in my closet- except on laundry day (it helps that my closet has a connecting door the the laundry room). Now as soon as the dryer goes off, everything (minus jeans, socks, pj's, yard work clothes- those still go into the individual laundry baskets) gets hung up. The hanging bar is separated by cute labels for each family member plus a section for clothes in need of ironing. When laundry is done, the kids happily (I can wish, right?) hang up their clothes in their closet & put away the items in their baskets. And I don't have to fold nearly the amount of clothes that I did before:)
Front of label is cute paper that reminds me of the family member.
Back of label is the persons name.

Friday, April 13, 2012

DIY Stenciled Entryway Bench

I guess since this is my first post I better introduce myself. My name is Bethany. I'm a stay-at-home-mom to 2 cute kids (a girl who is 4 and a boy who is 2 1/2) and a 3rd due in Sept. My husband is awesome. He's a writer and a comedian (I'm not just saying that because I think he's funny... he does improv and sketch comedy). 

We bought our first house December 2010 and I'm having a fun time being able to decorate it how I want to.  My favorite paint colors for the walls are blue and grey. I love accents of yellow, white, blue, and sometimes orange or pink. 

I also have a gluten free blog, Gluten Free in Utah, that I try to keep up with. So between gluten free recipes, decorating/crafting, and "mom stuff" (I can be very opinionated and love pondering on different topics) that's probably what you'll see most of from me. 

Oh, and I am the 3rd sister of this crazy bunch :). 

Anyway, onto the fun stuff:

__________________________________________________________________________

 DIY Stenciled Bench
My husband has an old roommate who is really awesome (actually he's got a few of them... we still get together with them and their equally awesome wives multiple times a year). This particular roommate is really good with building and was wanting a new project, so he offered to make me the entryway bench I'd been wanting. 

He had me send him plans and he built it! And I love it! He and his wife ended up making it a housewarming gift for us :).

These plans from Modern Jane were the ones I showed him. I wanted something functional that we could use for storage. I had plans to paint it white and then make a cushion for the top, but I changed my mind. Here's what I did instead:
 
I couldn't find a fabric I wanted, plus the foam can get kinda pricey. Plus, I knew it was going to get dirty often and I didn't want to have to worry about washing the cushion all the time. So I stenciled it! Now I can just wipe off all of the fingerprints (and footprints from my kids hanging up their jackets on the pegs above it). 

And I LOVE it!!! The stencil is actually one I made. I found a free printable quatrefoil pattern and then made a stencil from a stencil making kit my mom had. It went really quickly to stencil. 

I painted the inside and the sides grey and all of the trim white.

We keep shoes in the right side and seasonal items in the left (hats, gloves, etc.). Since taking this picture I've actually gotten an identical basket for the left side ($7 from Walmart). It fits perfectly. The bag has moved since I got the bigger basket for the left side (it was a bag for my church calling stuff). Now I have a tote bag in it that has sunscreen, snacks, and diapers for when we go on a summer outing.  

It's been the perfect addition both aesthetically and functionally for our entryway! Thanks Mike and Shaina! We love it!

Friday, April 6, 2012

Eggs, Eggs and More Eggs

Its Easter time which equals a fridge full of hard-boiled eggs! After the hunting fun is over, what do you do with your eggs? Here's what my mom made as our traditional food and also some other ideas of how to use those delicious eggs.

Every year, my family went out into the wilderness by my home to an old dam where we flew our new Easter kites and slid down the overflow. My mom would then pull my favorite food from the cooler, egg salad sandwiches. She makes them so amazing and the best part is that the recipe is simple.

Peel and cube about 6 eggs.
Add 2-3 Tbs. Miracle Whip (make it as moist as you like)
Salt and pepper to taste.
Slap on some bread (It always tasted better on white for some reason).

Don't forget the potato chips! Yum!

If you aren't in the mood for sandwiches, here are some other egg ideas.
Deviled Eggs (A recipe from a cooking class I took with some modifications)

3 eggs
1/4 tsp. mustard
1-2 Tbsp. mayonnaise
salt and pepper to taste
1 Tbsp. sweet pickle relish, drained (optional)
1/4 tsp. vinegar (optional... for a bit more zing)
Paprika (optional)
Ziplock bag

Peel eggs, cut lengthwise and remove yolks. Put the whites in the fridge until the ready to fill. Put the yolks into a zip lock bag. Get all the air out and then seal it and mash the yolks by hand. Open and add other ingredients you want. Again, press the air out and mash/mix by squishing the bag (great job to get the kids involved.) Pull the egg whites out of the fridge. Cut off a corner of the bag and pipe into each white. You can then sprinkle paprika on each for some color (I don't notice a significant change in flavor doing this.)
Refrigerate until ready to serve.

Eggs are also great to throw in potato salad or a green leaf salad. And, of course, they are always tasty with salt sprinkled on each bite of a whole egg.

Happy hunting and then happy eating!

Thursday, April 5, 2012

Personal Intro- 3 Minute Easter Centerpiece

Hello! Here we go. I guess I will help get the ball rolling and post something. I am Rosa Lee, the worst blogger ever! Oh, and I'm sometimes a little dramatic (can you tell?). But really, I have a hard time doing the same thing over and over (i.e. blogging weekly). Ask my husband, I can't even make a recipe the same way twice. This is a way to prove to myself that I can concentrate and complete an ongoing task.
More about me. I earned a degree in Family Life with a focus on Interior Design within the home but I choose to stay home for the best job ever- Mom. When my munchkin is asleep (rarely), I do historical transcription work. I'm married to an amazing man who can out-design me any day. He is currently earning his Masters of Landscape Architecture degree. When we are not chasing our kiddo, we are usually exploring the outdoors or making something for our home. Because we are on a TIGHT budget, almost everything we make is re-purposed. This blog will highlight some of our favorite projects as well as some other things I like to dabble in such as cooking and genealogy. Also, expect to see other projects I'm not so good at such as sewing and crafts. I WILL conquer them!

Let's get started... Here's a 3-minute Easter centerpiece for my kitchen table.
-Find any vase
-Get some plastic eggs and throw them in the vase
-Find some branches (Pruning season is a great time). These are from a tree in our front yard that blew over. They have buds on them which just add to the Spring feeling. I saw a similar idea online where they cut scrapbook paper into leaves and glued it to the branches. It was cute but way too much work for me and I don't have scrapbook paper. *Key to cheap design= use what you have!
-Find some fabric or a table runner and put the final product on top
Voila! C'est magnifique!... or something.